


Call or Text
How to Survive Living at Home During a Kitchen Remodel: Practical Tips That Help
How to Survive Living at Home During a Kitchen Remodel:
Practical Tips That Help in Bellevue — Trusted by your neighbors.
Fast, honest service with upfront pricing.

Our team is here to answer your questions and help you get started on turning your vision into reality.
How to Survive Living at Home During a Kitchen Remodel: Practical Tips That Help

You knew the remodel would be disruptive. What you didn’t expect was how quickly “disruptive” would start to feel like “unbearable.”
How to Survive Living at Home During a Kitchen Remodel: Practical Tips That Help — that’s exactly what this guide covers, because surviving it well comes down to a handful of things most contractors never think to tell you.
Where do you actually cook when your kitchen is gutted? How do you keep dust out of your kids’ rooms? What do you do when workers show up and you have no idea what’s happening that day? These aren’t small questions. They’re the difference between a remodel that feels manageable and one that slowly grinds your household down.
We’ve worked through enough Bellevue kitchen remodels to know what makes families feel like they’re holding it together — and what makes them feel like they’re not. The answers are more practical than you’d think.
What’s Covered on This Page
Protecting Your Home From Dust and Debris Is a Daily Priority
A Clear Daily Schedule With Your Contractor Reduces Stress Significantly
How do you keep dust out of the rest of your house during a kitchen remodel?
What is the biggest mistake people make when living at home during a kitchen remodel?
Does Bellevue’s climate affect how a kitchen remodel disrupts daily life at home?
How do you stay sane when workers are in your home every day?
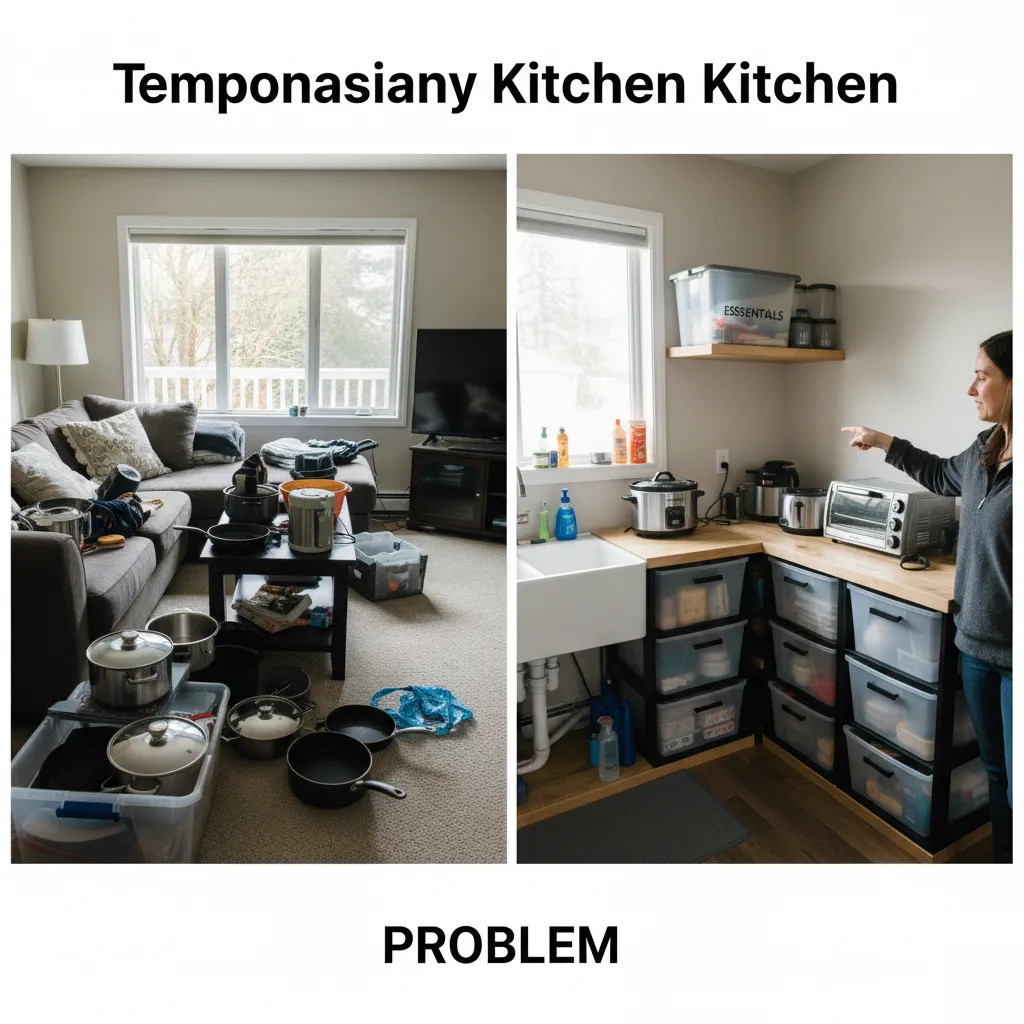
Setting Up a Temporary Kitchen Makes Daily Life Much Easier
Most people underestimate this part. They assume they’ll just “figure it out” once demo day hits. But by day three of eating cold cereal in the dark, the plan falls apart fast. A real temporary kitchen — even a basic one — changes everything about how a remodel feels to live through.
The goal is simple: keep your household running without your main kitchen. You don’t need much space. A corner of the dining room, a spot in the garage, or even a cleared section of the laundry room can work. What matters is that you set it up before the remodel starts — not after you’re already knee-deep in dust and drywall.
Here’s what we recommend pulling together before demo begins:
A countertop or freestanding microwave
An electric single- or double-burner cooktop
A small coffee maker or electric kettle
A mini fridge or a cleared shelf in another refrigerator
A folding table for prep and eating
Paper plates, disposable cups, and a small bin for trash
A plastic bin with dish soap, a sponge, and a drying rack — for rinsing in the bathroom sink
That list covers about 80% of what you actually need day-to-day. According to the National Kitchen and Bath Association, kitchen remodels average six to eight weeks in duration. That’s a long time to rely on takeout alone. The cost adds up faster than most families expect.
One thing most guides get wrong: they tell you to stock up on paper goods and leave it at that. But the real problem isn’t dishes — it’s cooking. A single electric burner lets you make eggs, pasta, soups, and stir-fry. That one appliance does more for your sanity than anything else on this list. We’ve seen families in Bellevue go six weeks on a two-burner setup with zero restaurant bills. It’s doable.
Location matters more than most people think. Put your temporary kitchen somewhere with good lighting and easy access to a water source — even if that means carrying a pitcher back and forth. A dark corner of the basement sounds fine in theory but gets old by week two. The dining room is usually the best option. It’s already a place where people gather to eat.
Ventilation is worth thinking about too. Running a microwave or electric burner in a closed room builds up steam and smells fast. Crack a window or run a small fan. This is especially true in tighter homes where remodel dust is already circulating through the air. For a broader look at ways to protect your home during remodeling, Family Handyman has a practical rundown worth bookmarking before your project starts.
From the field: On a recent whole-kitchen gut job in Bellevue’s Crossroads neighborhood, the homeowners set up their temporary kitchen in the sunroom with a two-burner induction cooktop and a mini fridge. They said it felt almost normal by week two — and they only ordered out a handful of times the entire project. Having guided dozens of Bellevue families through this exact transition, that sunroom-style setup is consistently the one we recommend first.
Keep the setup clean and organized. Label bins. Have a dedicated spot for clean dishes and another for dirty ones. It sounds overly simple. But when you’re tired and the house is chaotic, a little structure in your temporary kitchen is the thing that keeps daily life from feeling completely out of control.
If you’re planning a full kitchen remodel and want to talk through what the timeline and disruption actually look like, our Bellevue kitchen remodeling page walks through the full process from planning to final walkthrough.
Protecting Your Home From Dust and Debris Is a Daily Priority
Kitchen remodels create a surprising amount of dust. Fine particulate travels through HVAC vents, under doors, and into rooms you’d never expect. According to the EPA, construction dust can contain silica, wood particles, and drywall compounds that irritate lungs and settle on every surface in your home. This isn’t just a cleaning problem. It’s a health problem if you let it go unchecked.
The single most effective thing you can do is seal off the work zone before demolition starts. Not after the first day. Before. We had a client in Bellevue’s Crossroads neighborhood last spring who waited until the end of day one to hang plastic sheeting. By then, drywall dust had already coated the dining room buffet and crept into the hallway closet. That one afternoon cost her an extra four hours of cleaning.
Use heavy-duty 6-mil polyethylene sheeting to seal doorways and any open wall cavities. Tape it directly to the door frame with painter’s tape — not just draped loosely. Loose plastic billows every time someone walks past. A billowing barrier is barely better than nothing.
Zip-wall systems work even better. They use spring-loaded poles and zippered panels so crew members can move in and out without breaking the seal. We use these on most of our jobs now because they hold up over a multi-week project far better than taped plastic does. The zipper stays tight even after twenty trips through in a single day.
Your HVAC system deserves special attention. Dust gets pulled into return air vents and then distributed to every room in the house. Cover every return vent in the remodel zone with a filter, or tape a layer of cheesecloth over the register. Turn off the system entirely during heavy demo if you can manage the temperature. According to the American Lung Association, fine particulate matter from construction activity can worsen asthma and allergy symptoms, especially in children. If you have kids or anyone with respiratory sensitivities, this step isn’t optional.
Most guides tell you to cover your furniture and call it done. Here’s what they miss: the path between the work zone and the exterior matters just as much as the barrier itself. Crew members track dust on their boots from the kitchen to the front door and back again. Lay down rosin paper or a canvas drop cloth along the entire travel path — not just in the kitchen. Change it every few days. Once rosin paper is saturated with dust and debris, it stops protecting anything.
Negative air pressure machines are worth knowing about for longer projects. These units pull air out of the work zone and exhaust it outside, keeping the rest of the house at slightly higher pressure so dust flows away from living areas rather than toward them. Common on commercial jobs. But they work just as well in a residential kitchen remodel. Ask your contractor if they use one — or plan to rent one if you’re managing subcontractors yourself.
Wipe down the barrier plastic daily. Dust builds up on the outside of the sheeting and falls into adjacent rooms every time someone bumps it. A quick pass with a damp cloth takes two minutes and makes a real difference over a three-week project.
One more thing most homeowners don’t think about: the gap under the kitchen door. Even a half-inch gap lets a steady stream of fine dust migrate out all day long. A simple door sweep or a rolled towel pressed against the base of the door cuts that pathway off. Small fix, big result.
Watch Our Video
See How We Handle How to Survive Living at Home During a Kitchen Remodel: Practical Tips That Help in Bellevue
A Clear Daily Schedule With Your Contractor Reduces Stress Significantly

Most people don’t realize how much of the stress from a kitchen remodel comes from not knowing what’s happening next. It’s not the noise. It’s not the dust. It’s the uncertainty. You wake up and don’t know if workers are coming at 7am or 10am — or if the kitchen will be unusable all day or just for a few hours. That unknown is what wears people down.
Ask your contractor for a daily schedule before the project starts. Not just a project timeline — a day-by-day breakdown of what crew is coming, what work they’re doing, and roughly what hours they’ll be there. According to the National Association of Home Builders, poor communication is one of the top complaints homeowners have during remodels. A simple printed schedule on your fridge fixes most of that.
We see this constantly on jobs here in Bellevue. Homeowners who get a clear schedule at the start of the week are calmer, ask fewer emergency questions, and honestly — they’re easier to work with. That’s not a criticism. It’s just what happens when people feel informed. The stress drops because the guessing stops.
Here’s what a good daily schedule should include:
Start and end times for each crew or trade
Which areas of the home will be active work zones
Any days when work stops or the home needs to be clear
When inspections are expected (if applicable)
A contact number if plans change same-day
That last one matters more than people think. Last fall we were on a Bellevue job where the tile subcontractor had to push back a full day because of a delivery delay. The homeowner had planned her entire work-from-home day around the kitchen being accessible that afternoon. A quick text at 8am would have changed everything. Instead, she found out at noon. That’s an avoidable problem — and it starts with setting the expectation upfront that same-day changes get communicated fast.
Some contractors send a weekly look-ahead every Sunday or Monday. Good system. Others prefer a shared document or a simple group text thread. The format doesn’t matter much. What matters is that you’re not left guessing. If your contractor doesn’t offer this, ask for it directly. Most will say yes without hesitation. The ones who push back on basic communication are telling you something worth knowing early.
Build your household routine around the schedule, not around hoping. If demo is happening Tuesday and Wednesday, plan those as “out of the house” days if you can. If electrical rough-in is Thursday and it’s a one-person job that wraps by noon, that might be your easiest day to work from the dining room. Matching your schedule to theirs takes about ten minutes of planning and saves hours of frustration.
One thing most guides get wrong: they tell you to “be flexible.” Fine advice, as far as it goes. But flexibility without information is just chaos with a positive attitude. Real flexibility means knowing the plan well enough to adjust when it changes. You can’t do that without a clear baseline schedule to start from.
Also — protect your mornings. If you have kids, pets, or a job that requires focus early in the day, tell your contractor. Ask that crew arrival be no earlier than a time that works for your household. Most contractors in the Bellevue area are used to this conversation. They’d rather know your constraints upfront than deal with friction every single morning for three weeks.
The schedule is your single best tool for keeping life manageable during a remodel. Get it in writing. Review it weekly. And if something changes, expect a heads-up before you find out the hard way. If you’re still in the early stages of figuring out what your remodel will actually involve day-to-day, it may be worth connecting with a Bellevue kitchen remodeling professional who can walk you through the full timeline before work begins — not after.
Now that you know what to look for — and what to ask for — let us handle the hard part. Our team has guided Bellevue homeowners through every stage of this process, from planning a temporary kitchen setup to final walkthrough. Call us at +1-425-696-3311 or schedule a consultation online. You’ve done the research. We’ll take it from here.
Frequently Asked Questions
Common questions about how to survive living at home during a kitchen remodel: practical tips that help services in Bellevue
How do you keep dust out of the rest of your house during a kitchen remodel?
Seal off the work zone before demo starts — not after. Use heavy-duty 6-mil plastic sheeting taped directly to door frames with painter’s tape. Loose plastic barely helps. Zip-wall systems with zippered panels work even better for longer projects. Also check your HVAC vents. Fine dust travels fast through ductwork. Covering vents in the work zone slows how far particles spread. According to the EPA, construction dust can irritate lungs and settle on every surface in your home.
What is the biggest mistake people make when living at home during a kitchen remodel?
The biggest mistake is skipping the temporary kitchen setup and assuming you’ll figure it out as you go. By day three, that plan usually falls apart. Most families end up spending far more on takeout than they planned. A simple two-burner cooktop, a mini fridge, and a folding table can carry you through six to eight weeks without much trouble. Set it up before demo day — not after the dust is already flying.
How long does a kitchen remodel typically take in Bellevue?
Most kitchen remodels in Bellevue run six to eight weeks from demo to final walkthrough. Permitting timelines through the City of Bellevue can add time depending on the scope of work. Structural changes or electrical upgrades often require inspections that must be scheduled in advance. Knowing this upfront helps you plan your temporary kitchen and daily routine around a realistic timeline — not an optimistic one.
Does Bellevue’s climate affect how a kitchen remodel disrupts daily life at home?
Yes — Bellevue’s wet winters and mild but damp shoulder seasons affect remodels in a few real ways. Keeping exterior doors open for material delivery lets cold, damp air in for hours at a time. That affects both comfort and drying times for things like paint and adhesives. Dust also tends to stick to surfaces more in humid conditions. Running a small dehumidifier in your temporary living space helps keep things more comfortable while work is ongoing.
Should you move out during a kitchen remodel or stay home?
Most families in Bellevue stay home and manage fine with the right setup in place. Moving out adds cost and stress. Staying home gives you more control over the project and easier communication with your crew. The key is having a real plan — a working temporary kitchen, dust barriers, and a daily schedule you know about in advance.
How do you stay sane when workers are in your home every day?
Set clear expectations before the project starts. Ask your contractor for a daily schedule so you know when workers arrive, what they’re doing, and when they’ll leave. That one habit removes most of the anxiety. Create a quiet room your family can retreat to — somewhere away from the noise and dust. Stick to your normal routines as much as possible. Meals, bedtimes, and simple daily habits give everyone in the house a sense of structure when everything else feels chaotic.
Call Hunnu Construction
Schedule your free consultation today!
Transform your outdated Bellevue kitchen into the space you've always wanted.
Monday 8 a.m.–6 p.m.
Tuesday 8 a.m.–6 p.m.
Wednesday 8 a.m.–6 p.m.
Thursday 8 a.m.–6 p.m.
Friday 8 a.m.–6 p.m.
Saturday 8 a.m.–6 p.m.
Sunday 10 a.m.–5 p.m.
Links
Terms of Use
Privacy Policy
Cookie Policy
Menu
© 2026. Hunnu Construction LLC. All Rights Reserved.